500万局の詰将棋

やねうらおさんの233万局面の定跡ファイルを最近使わせてもらったのだが、そのとき、彼のブログで5年も前に3手詰めから11手詰めまでの実戦詰将棋局面を500万例ほど生成して、これをテキストファイルを圧縮した形で無償公開されていることに気が付いた。で、 将棋盤に表示できるようなユーティリティーが欲しい旨のコメントをしている読者もいるみたいだし, これも早速自分のサイトのページに応用させてもらおうかと思った次第である。

で、まずは提供されている圧縮ファイルだが、解凍するとmate3.sfen, mate5.sfen, mate7.sfen, mate9.sfen, mate11.sfen の5つのファイルがでてくる。 それぞれテキストファイルであり、中身はsfen 書式で書かれた局面情報が1行1局面で記述されている。

これをweb siteのページにランダム、あるいは手数と行番号を指定して将棋盤のグラフィックスとして表示させたいわけである。

すべてのデータをブラウザに読み込ませるわけにはいかないので、データ自体はサーバー側に持たせ、ブラウザからは手数と行番号を指定してサーバーに問い合わせ、該当するSFEN一行を取得させて将棋盤上の駒として描画させる、という手法で実現させる。 サーバーでのデータ検索を最適化させるためにmysqlデータベースのテーブルにデータを格納して使う。

データテーブルは一つとして、コラムは手数と問題、各手数の問題カウント、および 通し番号として記録するとしてテーブル構成は以下となる。

FieldTypeNullKeydefaultextra
idINTNOPRIMARYnullauto increment
sfenvarchar(120)YESnull
moveintYESMULnull
rowintYESMULnull

このテーブルをまず作っておき、ここにテキストファイルからデータを流し込むわけだ。 で、今度こそPythonを使って見ようとPyCharmを立ち上げ(個人で使う分には無料なんだよね)ブラウザの検索機能で情報を拾いまくりながら、以下のプログラムを作った。

move と counterで検索することになるので、これらのフィールドはインデックスを作成しておく。

20行以上のパイソンを書いたのはおそらく初めてだが、 なるほどユーザーが多いわけだ。

このパイソンスクリプトを走らせてみる。 上のコードでは各行にスラッシュが8個ある、のと、スペースで分解したアレイ素子の因子が4つになる、というのを valid SFENの簡易判定基準とし、それ以外の行はスキップする構造にしてあったのだが、なんとここで10件近くのスキップが発生した。 テキスト行の情報も表示するようになっていたので ファイルをのぞいてみると、sfenが2行くっついた、つまり改行が抜けている個所が何件かあるのが分かった。 プログラムで生成したはずのファイルに何故にこのようなイレギュラリティが発生するのか不思議ではある。 とにかく手作業でこれらの行を分割し、テーブルをいったん削除して再度の挑戦を行った。Pythonのmysql connectorが優秀なのか、パソコンのハードを更新したからなのかはよくわからないが、500万件10分もかからず終わってしまった。

実は500万件なかったのである。mysqlのデータベースが言うには実際には以下の件数の局面が入っていた。ただこれで目くじら立てるのは野暮というものだ。

3手 998,405件
5 手998,827件
7 手999,071件
9 手999,673件
11 手999,998件

サーバーにPHPでAPIポイントをつくり、例えば /api/mate/3/1245というようなHTTPリクエストをサーバーに送れば、3手詰め、1245行目のsfenがjson formatでかえってくるような仕組みを作る。

ブラウザ側のほうはReactとほぼ同じように使えるPREACTをViteとTypeScriptのTool chainを使用しバタバタと書き上げて、出来上がったのがこのページ。 上の数字をもう一度よく見てもらいたいが、 200問くらいの問題集でも一冊全部解くのはなかなか根気がいるのに、いったい誰がこの圧倒的な数の暴力に立ち向かうというのだ?(ちなみに私は高校時代に買った内藤詰将棋200選をまだ全部解いてない)

やねうらおさんのブログにもかいてあるのだが、これは妙手が入った詰将棋とは違って実戦詰将棋的な問題集になる。 ほとんど並べ詰めのようなものもあれば、少し考える必要のあるものもある。 しかしなのだ。 例えば、この局面 ランダムにピックアップしたものだが、
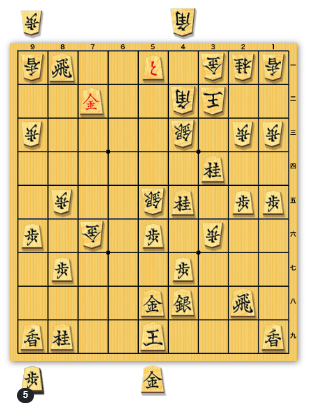
9手詰め 第88,592問目

最初に2二金打ち、同金としてから4二桂成 同玉以下は 尻にと金をすべらせていってからの飛車成りまでの送り詰めで9手と言っても難しい詰めではない。 詰将棋だと言って出されれば級位者でも解ける問題だ。 ただ実戦となるとこの局面で4五の桂馬が5三と3三を封鎖しており、さらに金を捨てて、3一の金をどかせれば尻金で詰む、そして4一と金のとき5二玉と逃げれば6一飛成で早く詰む、と局面の駒配置がよく見えなければ詰めようとも思わないわけで、実際これくらいの局面で3切れのShogi warsでは初段、下手すると2段レベルとの対戦でも手駒の金は温存したいと、初手から4二桂成と角を取ってくる可能性は自分の経験から言ってかなり高い。

だとすると、この類の局面を大量にながめて勘を鍛えておくことは棋力向上の役に立つのかもしれない。

それはさておき、ここまでできたなら将棋エンジンもつけて回答も導きだせるようにしたらどうだと言われそうだが、残念ながらそちらのほうの知見は自分はまったく持っていないのであった。思うにサーバーにエンジンを実装してというかバーチャルマシンを一台、それもパーフォーマンスの高いやつを立ち上げて将棋エンジンを常駐させ、これのAPIをたたいて正解を求めるというようなイメージなんだが、いかにもリソース費用がかかりそうだ。lishogiのサイトなどは実現しているみたいだが、どうしているのだろうか。 そのうちだれかが無料のAPIサービスを提供してくれないかと無想するわけである。

やねうらおうの定跡ファイルをサイトに使ってみた

ずーっと海外に住んでいて、将棋を指す相手がいなく、ヒカルの碁でネット碁の存在を知り、 こんなものがあるんだ、と検索して、Kurnickというゲームサイトを見つけ、そこでネット将棋を始めてみたら、みんな結構無茶苦茶な指し方をするのにびっくりして、英語の将棋入門サイトを作成したのが、今から17年くらい前、最初は静止画像をべたべたはりつけ、ブログに毛が生えたようなサイトだったが、フラッシュアプリを使った将棋盤というのが世の中にあるのがわかり、これを使って詰将棋やら最初の数手の説明、定跡の説明なんかをしていた。
割と早い段階で、フラッシュが駆逐されそうだということに気が付き、JavaScriptを勉強してフラッシュ無しでも動く将棋盤を自前で作成して自分のサイトで使い始めた。これがもうかれこれ12年以上前。これが幸いしてFlashが完全終息 した際のインパクトは避けることができた。

当時はそれなりに海外の将棋入門者の役にたったのではと思っているのだがそのうちYouTubeにHidetchさんが英語の将棋入門チャンネルを開き、さらに81道場を開設するにいたって、これは時代が変わったと悟った。 今ではほかのリソース、例えばYoutubeに上がる将棋の動画などもさらに充実し、DiscordではカロリーナのShogi Harborなど。 加えて自分もそろそろ終活を考慮しはじめるべき歳なのでこのサイト、もう閉じようかと思ったりするのだが、Statsを見るとまだ世界中からぼちぼちロボットではなく人間のアクセスがある。のでなんとなく続けている。 それにページを更新するごとにPHPの新しい使い方とかTypeScriptの勉強にもなるので、頭の老化防止にもつながっているような気がする。→どちらかというとこれが現在一番のモチベーションになっている。

最近何気にWikipediaの将棋の項目(英語版)を観たら外部リンクのリストの最初に自分のサイトが載っていて驚いた。ますます閉じにくくなった。

このサイトの中で何度か書き直しているページの中に、初めの数手の内容をまとめようとしたページがある。 最初はYamajunさんのサイトにある棋譜にリンクしていた。  しかしながら他のサイトへのリンクというのは実にあてにならないもので、 このリンクを含むリンク先の大部分が2019年時点で消失していた。 2009年当時Webの90%を占めていたFlash Player base のサイトが ほぼ全滅したのが大きいと思われる。
ならば自前でつくろうと考え、やり直しを重ねたこのページ。 一応形にはなったが、これは掘り下げていけばいくほど、もっと広げていきたい衝動に駆られる。

最近 やねうらお さんのGithubでやねうら王に使われている定跡の4年前のレベルのものが公開されているのに気が付いた。 自由にお使いくださいと書いてある。前にNHKの将棋講座の特集でだれかが将棋ソフトの作者さんたちは気前が良すぎるんですと言っていたが、まったくだ。  定跡フォーマットを見るとSFEN + move(s)の繰り返しのテキストファイルだ。 幸いSFENの読み込みと書き出し機能は自作のWeb用将棋盤表示アプリにすでに実装ずみなので、このファイルをそのまま使わせてもらってWebで定跡表示ができるのではないかと思いついた。

遠い昔 やねうらお さんというハンドルネームの方の、将棋界の内情を色々批評していたブログを見ていたようなきがするのだが、同一人物かどうかはさだかではない。 ただ、今や将棋プログラム界のドンとでもいえるような大活躍をされているようである。 5歳のときにTK‐80を使って8080のニーモニックを覚えたと書いているのを見ると、多分 自分より20歳くらい若い働き盛りなのでありましょう。自分がTK-80に触ったのはまだ日本にいたころ、取引先の業者がNECの代理店をやっていて、「遊んでみて」と持ってきたのが最初だ。モニターのルーチンを使ってスクロール表示をくるくる回しただけで満足して 終わったような気がする。

ともあれ、定跡ファイルをばらしてMySqlデータベースに落とし込んでみた。Pythonを覚える良い機会と思ったがコマンドラインでもPHPが使えることを思い出し、コードもあっさりかけてしまったので、Pythonの学習はまたもやお預けだ。(ファイルサイズが87メガバイトの大定跡ファイルは、MySQLに落とし込むのにPHPをコマンドラインで実行させて4~5時間ほどかかった。 専用サーバーではなく、他の業務と兼用なので、こんなものなのかもしれない)

局面数指し手数
やねうら王定跡(2016)130,182155,443
やねうら王大定跡(2016)428,2442,433,672
やねうら王テラショック【WCSC29】285,463512,860
各定跡ファイルの持つ局面数と指し手数

Web ServerにSFEN文字列を送るとと候補手のアレィをリスポンスとして返してくれるようなAPIを作成し、ページを追加してみた

我ながら GUI デザインのセンスが無いなあと思うのは毎度のことだが、 面白いなとおもったのは最初の定跡(説明によるとFloodGateで収集した棋譜を24手まで統計的にまとめたもの)の初手の頻度が人間の指す初手の頻度とほぼ一致していた点。2016年当時ということもあるのだろうが、ソフトというのは、もっと自由な手を指すのかと思っていた。この統計頻度の高い指し手を選び続けて行くと先手左美濃対後手四間飛車になる。 こういう風に指すんですねえ。
一方局面評価をしまくって精選したという100Tera Shock定跡なるデータファイルのほうでは評価値が高い指し手を選び続けると横歩取りに誘導される。

大定跡は一番充実しているはずなのだが、評価値の高い指し手を選んでいってもはやばやと定跡から外れるケースが多い。 原因は Mysqlへの落とし込みに失敗しているか、最初から定跡ファイルがそういう作りになっているかのどちらかだがよくわからない。ただ、下の表に示したように、初期局面1にたいし、二番目の(一手目)局面が14種類、三番目の局面(2手目)が56種類 と多くなっていくものの局面数が、指数関数的には広がっていないので結構枝をはらっているのはわかる。でも第一候補の次の指し手が無いというのはなんかおかしい。 暇ができたら見直してみます。

11
214
356
4135
5323
6678
71289
81922
92714
103623
114812
125995
137181
148407
159741
1611136
1712492
1814160
1915731
2017425
2118979
2220500
2321883
2423224
2524374
2625479
2726567
2827704
2928792
3029952
3131001
3231954

これだけの局面数と指し手を評価して枝をはらっていくというのは相当にリソースと時間が必要になると思うのだけど、それをgithub上にポンと公開してくれているのは 大丈夫ですか、と思ってしまう。恩恵にあずかっているわけですが。

Personal notes on Implementing autoPublishing mechanism to custom DB table within modx3.

A need.

  1. I have a custom database setup inside my modx3 install. Recently I started to think of adding a auto-publishing feature for this database, just as the modx3’s siteContent table is capable of doing.

Pre-requisite and assumptions.
1. MODX3 installation
2. Custom database table inside the MODX installation, which is created from modx database schema. I used migx’s package manager to create/modify one.
3. Let’s say that the class name of this dbtable is /MyDB/Model/Mydb
3. A custom table schema for modx to construct the table and associated code structure needs the following fields added to the schema. Note the data type for those date fields are all datetime. and not int(20) like original siteContent table fields for page resource. The difference will be dealt in the implementation code.

4. The auto-publish mechanism will mimic the existing code for modResource autopublishing mechanism. This reference code lives in core\src\revolution\modcachemanager.class.php. (for MODX2, the file is in core\model\modx\ folder)

5. The function I want is to toggle the record’s published flag based on records’ pub_date and un_pub date. It is still my implementation code (snippets) to filter records based on this flag to display data in the web site.

Two code segments have been written. The first is auto publishing functionality. The code heavily borrows from the aforementioned built-in autopublishing code, which is for page resources.

Some points to note.

  1. dbtype for these dates are datetime. In original code, they are integer(timestamp).   MySql function unix_timestamp() is used inside the query to  convert them as needed.
  2. The function return type is changed from array to void. I thus removed all return values construction as I could not think of any use case in my usage scenario.
  3. This code, when invoked will fetch the cache file /core/cache/my_db/auto_publish.cache.php. The file will return a timestamp value or 0 or null. The location of the cache file is defined in $options array and separate from the system’s auto publish cache file.
  4. if timestamp returned is less than current timestamp but not 0 or timestamp returned is null (meaning there is no cache file) then it proceeds to auto_publish function Otherwise it will return without doing anything.
    1. Auto publishing function will do the following. They are basically two pdo queries.
      1. Publish all record that’s pub_date is less than current time, unset pub_date, set publishedon to pub_date.
      2. Unpublish all record that’s unpub_date is less than current tme. unset unpub_date and unset publishedon date
      3. set new cache value to minimum of remaining unpub_date and pub_date sets.
    2. In the original code, Unpublishing query is resetting both unpub_date and pub_date. I can not see any side effects on not unsetting pub_date so I left it out.

Now, when to invoke this code? The original Resource auto_publishing code is invoked whenever resource is accessed.

I originally added the code as a snippet to my site’s landing page so that the code will execute whenever somebody visit my site. But I also wanted to tryout the plugin functionality, so I saved the code as a plugin and named the plugin refresh_pub_date

Then in the system’s settings, I created a custom event. myCustomeEvent and enabled the refresh_pub_date plugin to this event.

The following code will invoke this event. So my snippet in the landing page is just that.

Second code is used to check for pub_date, unpub_date after record save/update

This code will be invoked when Mydb record is added/updated. Since I use migxDB to create a CMP for this DB table in the manager, migxDB custom configurator allows the easy way to attach the snippet to after save action.

{"aftersave":"mySnippet"}

If called this way, migxDB provides $postvalues array variable to allow access to posted data field that is needed to be convert to timestamp like so.

It also provides $object variable for the class object (including record fields that are not posted) So the same value can be retrieved with usual get method.

Note: If I don’t use migxDB CMP configurator and write my own class processors extended from MODX processors, retrieval of the same value in aftersave hook in the update processor would have been

There was a bonus take away from this project

  1. I learned how to use MODX Cache file system. The main purpose of using the cache files must be obviously to eliminate a need of re-running of various codes on server side. However I can also do things like the following to record values of variables into the cache file for debugging purpose.

array_reduceの話2

array_reduceと arrayのsplat オペレーターを使うと、同じアレーを生成するという意味のない関数ができる。

で、パターンを使って、array_mapもarray_filterもarray_reduceで代用できるというお話

めでたし、めでたし

array_reduceの話

PHPでプログラミングするとき、例えば、以下のようなアレィがあったとする

この内容をキーとともにリストアップしたいとき、まず思いつくのがforeachを使ってこう書く方法

ただ、このアレィの複数エレメントを一つの値(この場合は一つの文字列)にまとめるという風に考えるとarray_reduceという関数を使っても同じことができる

この関数、単純なArray処理は問題ないとして、Associative Arrayを処理するとなると、はたと困るが、渡すArrayを値ではなく、キーを渡すことで可能となる。これは一つ目の因数にarray_keysを使うことで実現できる。コールバックには因数が二つ付くが、慣習として$curry と$itemという変数名を使う。for 文に$iをつかっているのと同様で、もちろんほかの変数名としても問題ない。$curryは結果を集積していく入れ物。$itemはアレィの各エレメント。上の例ではコールバック関数はアローファンクションを使ってインラインの書き込み。 三つ目の因数($output)は初期値

このarray_reduceの使いかたをネットの検索などで探すと、数字を加算していくような例がよく紹介されているが、上のように文字列アレィの加工にも有効。 さらに、このアレィは関数のアレィでもよいわけで、例えば、複数の関数で同じ文字列の処理を繰り返すような場合、例えば、文字列をトリムしあとhtmlにエンコードしたい場合など、つまり同じ文字列に何度もパスをかけて加工したい場合など

$output=trim($output);
$output=htmlspecialchars($output);
//または
$output=htmlspecialchars(trim($output));

のかわりに

$output= array_reduce([trim,htmlspecialchars], fn($curry,$item)=>$item($curry),$output)

と書いてしまう技がある。関数が二つなら最初のアプローチのほうがよさそうだが、かかわる関数が増えてくると、コードのメンテナンスは下のパターンのほうがすっきりするよ、とFunctional Programmingの推進者たちはいっているが、さてどうする。

$functionsArray=[fn1,fn2,fn3,fn4,fn5]; //同じオブジェクトに対し、5つの関数処理をおこないたい
$result=array_reduce($functionArray, fn($curry,$item)=>$item($curry),$initialValue);

“Why did I not think of this?” moment in MODX 3 snippet development with PHPStorm

This is one of those ‘Aha!’ moments.

MODX is one of CMSs (content management system) that I have been using for a long time to maintain my shogi site. Market penetration of this CMS is said to be 0.1%. As of this writing, 43% of of Web sites uses WordPress and no other CMS reach even 10% of market share. (source, w3techs.com . I actually think MODX penetration is much greater than this number, MODX does not leave big footprint to show it’s identity in front of web crawlers. -Many sites I know powered by MODX, including mine – were identified as non-CMS site by w3tech’s tool.— Nevertheless, there is no doubt WordPress dominates the CMS market)

Although both uses same language (PHP) for powering the site, MODX gives much more flexibility in site design but you need to be proficient with HTML and CSS (and JavaScript). In another word, MODX is a tool while WordPress is a product.

What I liked about MODX over WordPress at the time was a separation of PHP code and HTML. This was a long time ago so the situation might have changed on WordPress, but I have been happy with MODX since.

At the time, I also looked at Drupal and Joomra . All of them forces you to follow their interpretation of what website should be. MODX has no opinion on how you want to create Web site. You have a total freedom.

On the other hand, if the only thing you want to do with your site is blogging, there is no better solution than using WordPress.

I digressed. Back to the subject!

With a wealth of plug-ins available, your rarely need to code in PHP. When you do though, MODX separates a PHP coding part from HTML with a thing called Snippets. A snippet is then inserted in to HTML with a use of tag.

[[aSnippet]]

You can edit a snippet within MODX backend’s editor. With a plugin like ‘ACE’ there is a nominal amount of syntax checking to the PHP code. Unfortunately, I am being spoiled with convenience of IDE such as PHPStorm,

MODX backend, Snippet editor with ACE plugin

So there is a desire to be able to write a snippet code using PHPStorm and get benefits of auto-completion and methods hinting, strict error checking and warning.

Unfortunately, there is no plugin in PHPStorm for MODX or MODX plugn for PHPStorm.

When I google “MODX with PHPStorm”, there are several hits, Although none of them gave me a direct answer on what I wanted to do, I was able to put enough facts together and came up with a solution. The solution that was just waiting for me to assemble few known facts, that I have used all of them separately in the past!


1. Fact that PHPstorm can create a project using existing remote site contents, so that PHPStorm can pull all file setup from MODX site.

PHPStorm->File->New Project from Existing Files


2. Fact that PHPstorm can then start syncing file contents of my local project files to server files.

File sync options available in PHPStorm

Ok, but Snippet is stored in Database. the code is not in the file, but then,

3. Fact, MODX snippet code can be from a static file, meaning I can create a PHP file and feed it as a snippet to MODX by turning on “is Static” option and point to the file location

Is Static option is turned on for Snippet. Snippet is now fed from “static file”


Result: When I combine those 3 factors, I can create a snippet with a comfort of PHPStorm IDE environment.

Snippet now editable in PHPStorm
Snippet output on browser page, powered through MODX

What do I gain? Full context support and code hinting, as PHPStorm analyzes whole MODX site and figures out all variables and object and its methods being used inside MODX. I have to give credit to MODX development team for fully documenting source files. Thank you!

PHPstorm explains what getOption method is
PHPStorm autocomplete support in action.

You can also open the corresponding file by pointing to method and do control-b to drill down on function.

I edit a file in PHPStorm, and you either 1) turn on auto-sync between your local files and server files or 2) manually upload changed file to server. Then I can run and test the snippet with MODX backend immediately.

So all of the sudden, I feel like invincible. It will be very hard for me to make coding error. (Ok, logic error still possible)

Once Snippet development is done, you may switch off the ‘is static’ option and keep the snippet inside database, remove the php file from the system.

One thing that is kind of annoying is that by default, PHPstorm thinks $modx variable is undefined. The default setting on PHPStorm’s inspections on undefined variable is somewhat on conservative side. It will not even acknowledge variables from included file!. To mitigate this, you need to put a check on “Search for variable’s definition outside the current file”

PHP settings->Editor->Inspection->PHP->Undefined symbols->Undefined variable

It hurts to think that I have been using both PHPstorm and MODX for more than 10 years and I am figuring this out just now 🙁

Creating a Blog page inside MODX version 3 web site

MODX comes clean slate so there is no ‘ready to use’ provisions for creating Blog style site. One has to set it up using tools available in the CMS.

I took an easy way out for my production site by creating blog site using free wordPress service and then feed content to MODX page. with this, the only extra you will need is Spiefeed to handle rss feed from WordPress.  But for purist approach it is certainly possible to setup blog section within MODX using few extras.

There are several articles available for creating Blog sites using MODX.  The one shown in the modx official site is somewhat dated, but the article actually have a link to the instruction/article of more recent implementation of MODX blog site.  Link is here.   Better yet, this instruction is accompanied with a package published in the github which has all chunks, a snippet and a template packaged up to duplicate the blog site that the article discusses.  A demo site is also available to check out the feel of using this template. The document states that the demo utilizes MODX 2.7.  So can I use this setup with MODX 3 site? Furthermore, the instruction assumes you want the Site to be a blogging site. Can I add ‘Blog page’ to already existing MODX site? Answer to both questions are ‘Yes’ but we need to modify some parts.

To start, I could have created each chunk and template manually following the instruction but to reduce my typing effort, I went ahead and downloaded the demo package. I also installed dependent extras (getResources, getPage, Collections, and Tagger).  Previously, I did not have any of those installed. – I am using pdoTools  to get resources and get page. – <edit> It was fairly easy to change references to getResources and getPage to equivalent pdo* snippets.

Again, the setup instruction is written for MODX version 2.7 and the site I am setting up this blog structure is version 3.0.3.  Setup also assumes the top page is a site home page. There are several area in chunks and template that refers to [[++site_start]] and this need to be changed to point to correct Resource.  I want to have a blog page as a subpage of the site.

Looking through the template and snippets that I setup with the downloaded package , I found some more modifications were needed.

I will list out those changes.

  1. My server uses Nginx and it needs additional html tag to specify base url in <head> section of blog template html. Without it, Friendly URL won’t work correctly.
    <base href="[[++site_url]]">
  2. In MODX 3, [[*class_key]] does not return “modResource”.  It returns “MODX\Revolution\modResource”.
    This means I get “MODX/Revolution\modDocument” or “MODX\Revolution\CollectionContainer” in [[*class_key]] field depending on resource selected. Two sections of “Blog Template” stops working due to this.

    1. Template tries to pull in “jumbotron_CollectionContainer” or “jumbotron chunk based on [[$jumbotron-[[]*class_key]]] tag. This tag doesn’t work in MODX 3 as it returns [[$jumbotron-MODX/Revolution/….]] which does not exist and forward slash within chunk name is probably invalid anyway.
    2. Template tries to insert [[$blog_listing]] or [[$blog_article]] based on conditional modifier [[*id:is`[[++site_start]]`:then….]] but the blog_listing page is not at [[+site_start]] resources in my use case.
      1. To mitigate both problems, I have created a system setting [[++blog_start]] in custom namespace/area and set it to id of a blog home page resource I created. Then rewrote tags as follows.
        For jumbotron section
        [[[[*id:is=`[[++blog_start]]`:then=`$jumbotron-CollectionContainer`:else`$jumbotron-modDocument`]]]]
        For container section
        [[[[*id:is=`[[++blog_start]]`:then=`$blog_listing`:else=`$blog_article`]]]]
      2. Note: It will be probably not that difficult to create snippets and replace conditional tags here.
  3. getResources and getSnippet tags are used to aggregate child resources and parents properties are set to site home page [[++site_start]].   These needed to be changed to aforementioned [[++blog_start]].  These changes had to be made on $blog_listing chunk and $jumbotron-CollectionContainer chunk.
  4. @groups properties are hardcoded in calls to TaggerGetTags snippet.  The snippet is called from $aside chunk is setting @groups to 1 and the snippet called from $headder chunk is setting @groups to 2.  Make sure this agrees with your tagger group settings. I have first created ‘Category’ group and then ‘Archives’ group so I needed to change them to 2 and 1 respectively.
  5. Last and least 🙂   as this is just a demo template, links to “subscribe”, “search”, “Sign up”, “GitHub”, “Twitter” and “Facebook” are all mocked and pointing to itself.  You either need to remove or put actual link to them when modifying to suit your site design.

So, in order to create a Blog section within Modx 3 hosted website, using this instruction and elements in the github repo, One needs to be aware of:

  1. Modx version 3’s breaking change of the model class caused decision logics inside Blog_Template to stop working.  Rework of the logic flow was needed.
  2. Friendly url.  Nginx needs base href reference in head section.
  3. Creating a blog section other than home page location. Needed to change references to [[++site_start]] system settings to [[++blog_start]], a user created system setting
  4. Adjust the template design to fit with other area of site design.

Some more miscellaneous items to note.

  1. $blog_listing_item chunk, content placeholder has a modifier :firstp. There is a firstp snippet that is installed with the package.  I opted to replace it with ellipsis=`500` modifier to limit the content output to first 500 chars followed by ellipsis to suit my preference.
  2. Also in $blog_listing, getPage snippet uses @blog properties set. This set does not exists so the default property set will be used instead. I think idea is to create a blog property set within getPage snippet to override the default property settings in easy way, if customization is needed.

Commenting on the posts are not possible.  This need to be setup by yourself and will require Quip extra. that part is not covered by this article. One has to go back to modx documentation’s tutorial section.


factory function?

JavaScriptやPHPで、Function Factoryという言葉を見るのだが、これは共通するパターンのFunctionを生成するためのFunctionということで、例えば


$double = function($x){
    return $x*2;
};

$triple = function($x){
    return $x*3;
};

$quadruple = function($x){
     return $x*4;
};

なんてのは、三つのfunctionを定義していても、よく見ると、2,3,4とかける数字が違うだけで、あとはまったく同じパターン。 このようなfunctionの記述を効率よく行うために

というような書き方をするテクニック。肝心な部分の記述は一回で済むためコードの管理も簡単になる。

上のコードは返すコードのなかで、$xを認識させるため、 use ( $x )というクローズをいれているが、PHP7.4 からPHPでもアローファンクションが使えるようになり、これだとuse というkeyword無しで、外側で設定されている変数を認識するようになる。ので、

と、ファクトリーの部分の記述がすっきりする。

さらにこの上位のファンクションもアローファンクションで書いてしまうと

となり、 プロのコーディングでアローが二つも三つもかさなるような記述が時々でてくるのだが、そろそろ読解がしんどくなってくるので、後で読み返してわかる記述方法としては、よし悪しかなあ。

React Revisited after version 16.8

React というのは DOMの内容を簡単に操作しようという JavaScriptのライブラリーの一つだが、Shadow DOMという概念を導入し、JQueryのようにコマンドごとの実行でDOMを書き換えることはせず、Shadow DOMにある程度書き込んでおいてから描画する直前にまとめてDOMに書き込む。なので軽快に動作する、というのが売り。

数年前に覚えようとしたのだが、 二点腑に落ちないところがあって、結局、Vue.jsという他のLibraryを愛用(溺愛)するに至った。

その二点というのが

1.JSXという新しい概念の導入。 一見するとHTMLなのだがHTMLではなく、XML書式をJavaScriptで理解できるようにしたプリプロセッサ。この一見HTMLというのがくせもので、class= はJSの予約用語ゆえに使えずclassName=にしなければならないなど、細かいところで違っていて気持ちがわるい。(これに比べてVueのTemplateはまごうことなきHTMLの拡張)

2.コンポーネントで操作できる変数(State)を使うためにはコンポーネントをClass表記してsetState()という関数を使って管理しなければならない。

というもの。

その後 「JSXは単なるJavaScriptの関数表現」という開発チームの解説をYoutubeでみて ストンと納得できるものがあったものの、 二つ目のJavaScriptにClassが必要というのがなんとも納得いかない(個人の意見です)身としては今いち手が出せずにいた。 Class表記をするあまり、 thisの多用を行い、しかもそのContextを明示するためにClass Constructorに this.function=this.function.bind(this) を書きまくるというのがなんとも切ない。

しかしながら、 Reactの勢いは侮りがたいものがある。 特にMicrosoftのOffice開発系の方たちは Office UI GraphicsのComponentに「Reactは正義!」という感じで使いまくっている。 SharePoinitの JavaScript Frame workも Reactびいきがすごい。

で、最近React-client-appというCLIでReactのScaffoldingが簡単にできます、という記事をよく見るので、実際どれくらい簡単なんだいと試してみたら、 生成されるScaffoldingのComponentがClass表記ではなくfunction表記になっている。 あれ、これって、Stateful Componentは Class表記しなければいけないんじゃなかったっけ、と思ったが、 実はReactも進化していた。

Version 16.8から Hooksという機能が追加されて Functional ComponentでもStateの管理ができるようになっていた。 そして今まで、 Functional Component = Stateless Component, Class Componnet=Stateful Componentとなっていたものが、 どちらを使ってもよいようになっている。 Reactのサイトにも将来の開発にはFunctional Componentを使うのがおすすめと書いてある。 なので、React-client-appもDefaultで生成するコードはクラスレスになっていたわけだ。

紹介ページ https://reactjs.org/docs/hooks-intro.html にあるコードをみれば一目瞭然だが、クラス表記のようなConstructorもなければ、this. でメンバー指定をすることもない。 非常に簡単。 ただ、このHookを使ったクラスレスのステートフルコンポーネントの作り方、オフィシャルサイト以外で解説しているサイトはまだ少ない。

この

const [ var1, setVar1]=useState('this is variable one');

で気をつけなければいけないのは Var1が複数メンバーから構成されるオブジェクトだった場合、

const [obj1,setObj1]=useState({member1:"this is member 1", member2:"this is member 2"})

のように Obj1を宣言したときに、

setObj1({member2:"this is member 2 modified"})

とやってもsetState()と違って、オブジェクトの他のメンバー(Key)とマージしてくれない。上の例ではmember1が消えてしまう。

セット関数には元のstateがパラメータとして渡されているのを利用して、

setObj1(s=>({ ...s, member2:"this is member 2 modified"}))

とスプレッド表記を使ってマージしてあげる必要がある。(上のサイトにはObject.createを使うのも可と書いてある)

また、いわゆる ComponentWillMountなどのLife Cycle hookの代わりには描画毎に発火するuseEffect()を使えと書いてある。 このHookは発火を限定するために二つ目のパラメータ―で発火する条件を指定できる。 ファイルデータを読み込むなど、あるいはイベントリスナーを設定するなど、一回だけ発火させたい場合、 このパラメーターを空のアレイで渡してあげることで実現できる。(なんとなくハックっぽいが)

useEffect(()=>{Data を読み込む云々}, [])

他にも何種類かのHooksが用意されているが、 演習用にアプリを書いてみると、上の二つのHookだけで、それなりのものができる。

すでにJSXへのアレルギーはなくなっているので、クラスを使わなくてよいReactという選択は結構魅力的です。

すべてにVue.jsを使いたいのはやまやまなれど、SharePoint関連においてMicroSoft が Reactありきの開発を推しているというのはやはり大きい。